Deep Map™ Rules: Feature Attributes
This tutorial introduces an additional feature of the rules: feature attributes.
Consider the following scenario: we have a building with limited parking spaces and we would like to visually show how many spaces are free. Up until now, the only method to convey this information would be via annotations, but this is cumbersome, as the user has to click on the building before getting the desired information. It would be better if we could convey a rough estimate of the fill-rate by color, so the user sees immediately if there are free slots. We could use the setFeatureStyle() function, but this changes the color for all objects with the same featuretype, and it would be cumbersome to change the data to create individual featuretypes for each building that has a different fill-rate.
Feature attributes provide an elegant way of solving this problem. With feature attributes it is possible to attach self defined variables either globally to the map, or to specific objects.
Let’s assume that the building with the label “B3.3” is the one we want to style differently. This building has the featureId 16299. We can now add the current fill-rate as a feature attribute like this:
Objective-C
[self.mapView setFeatureAttribute:@"fillRate" value:@"123" withFeatureId:16299];
Swift
self.mapView.setFeatureAttribute("fillRate", value: "123", withFeatureId: 16299);
Android
mapview.setFeatureAttribute("fillRate", "123", 16299);
The first parameter is the name of the attribute we want to set. The
second parameter is the value we want to assign to the attribute as a
string. The last parameter is the object to which we want to assign the
attribute. We can either do this like above, or alternatively by the
originalSerial. Otherwise, if an attribute should be applied to all
objects of the map, we can use the setGlobalAttribute function. Like
setFeatureAttribute, this function takes two arguments for the
feature name and its value, but does not need a third one.
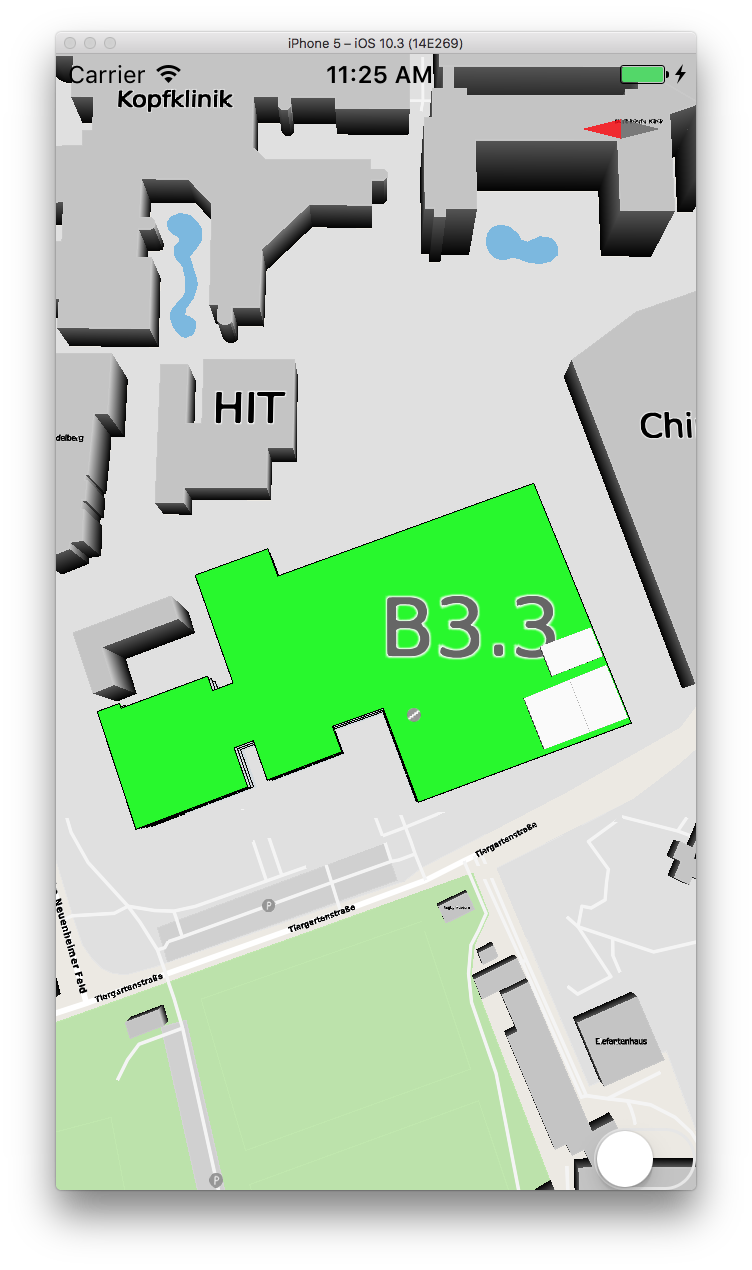
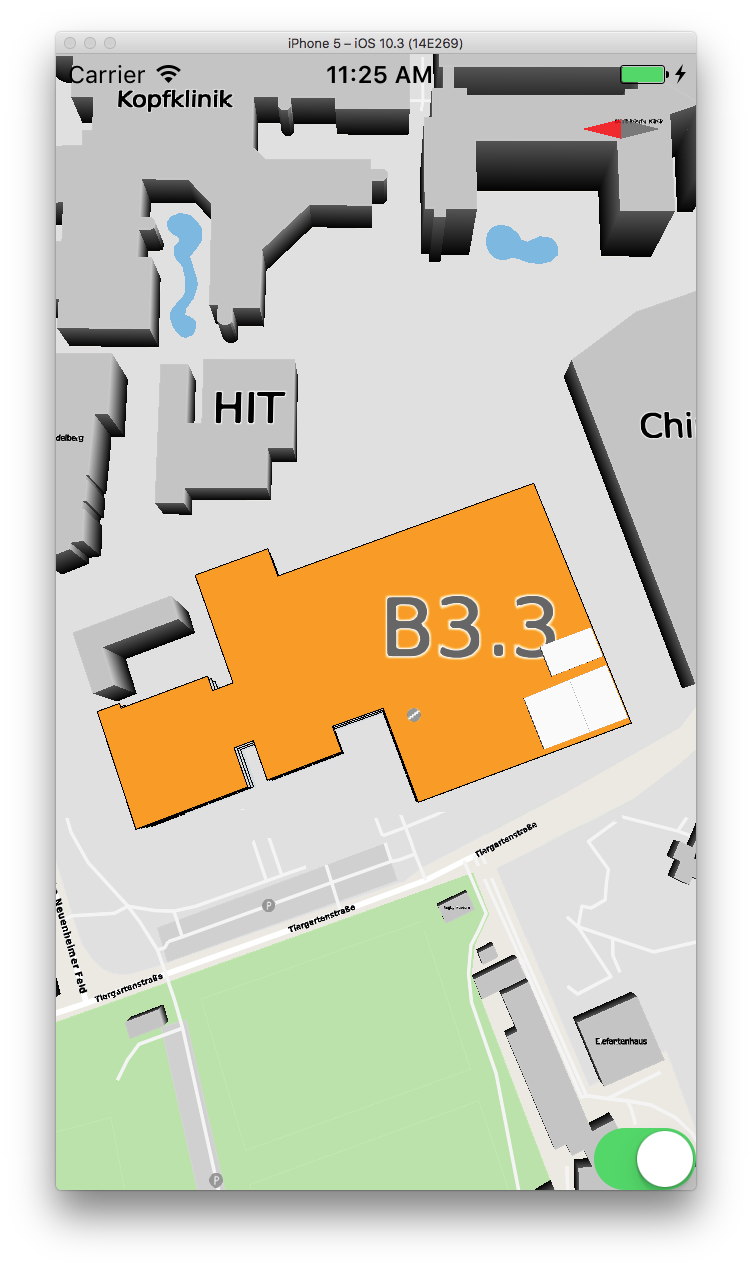
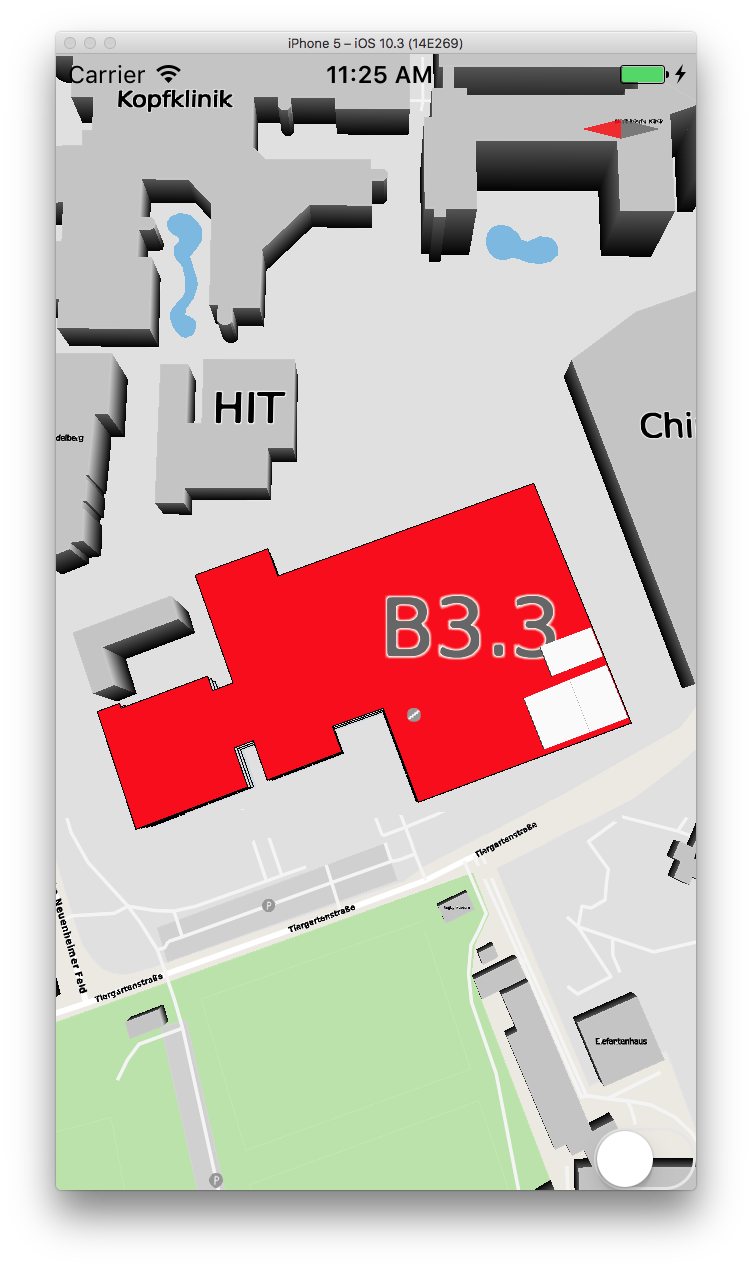
The feature attributes can be queried by stating the name of the attribute. For example, assume we want to color a building based on the fill-rate; green if less than 100 people are in it, orange if less than 200 people are in it, and red if there are more than 200 people in it. We can do this by defining the following three rules:
DeepMap™-Rules
rule buildingFillRate(building_type) ["fillRate < 100"]
{
    fill-color: #00FF00;
}
rule buildingFillRate(building_type) ["fillRate >= 100 and fillRate < 200"]
{
    fill-color: #FFa000;
}
rule buildingFillRate(building_type) ["fillRate >= 200"]
{
    fill-color: #FF0000;
}
|
|
|
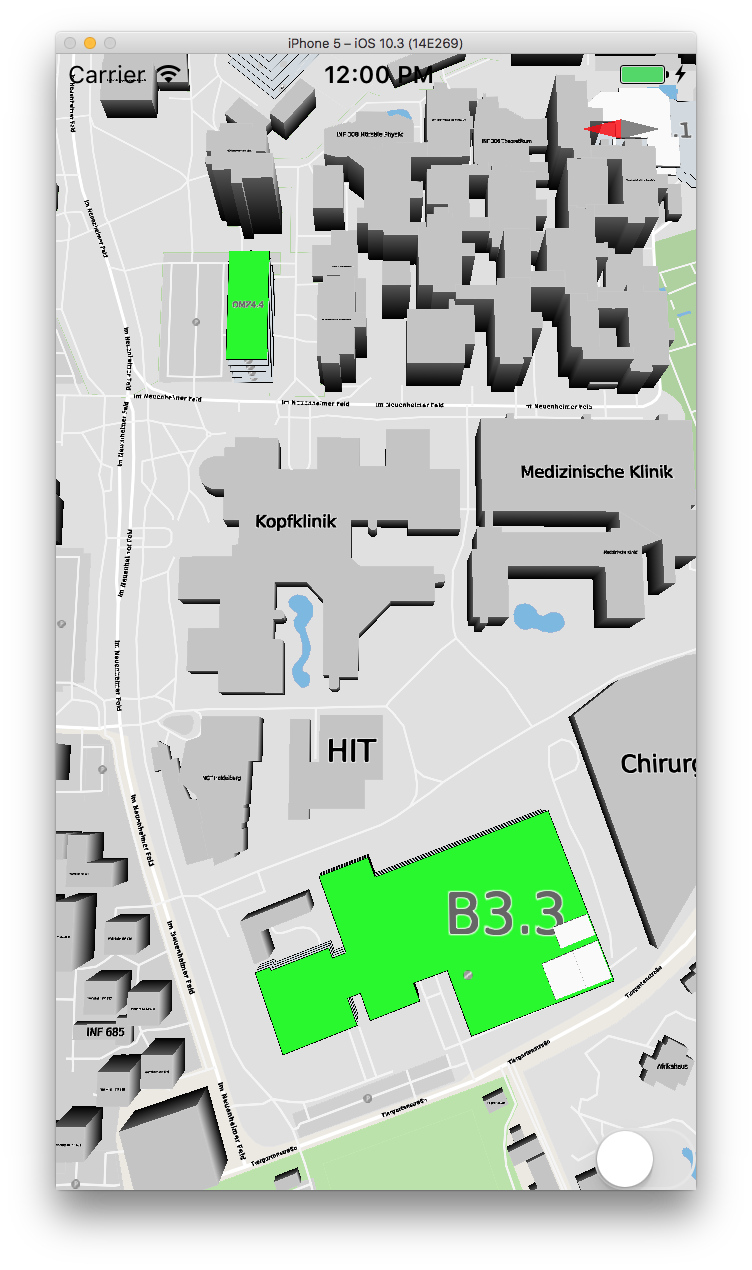
fillRate = 0 |
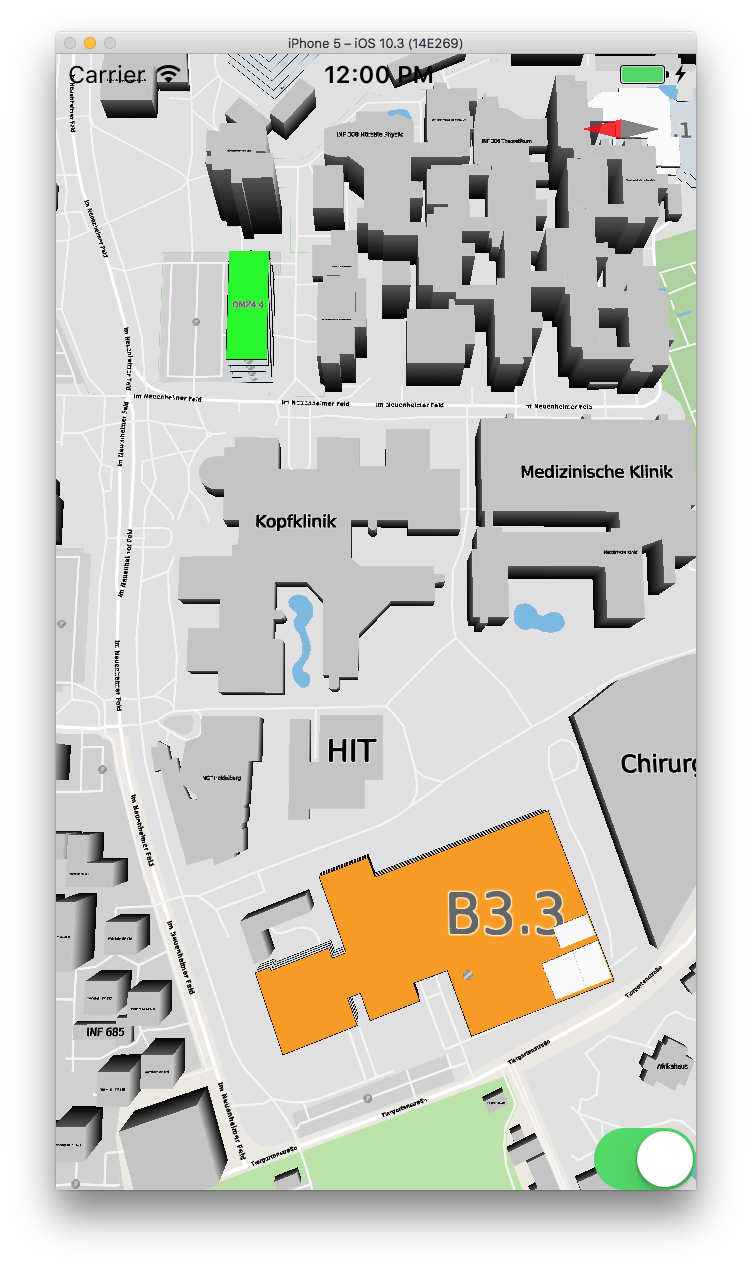
fillRate = 100 |
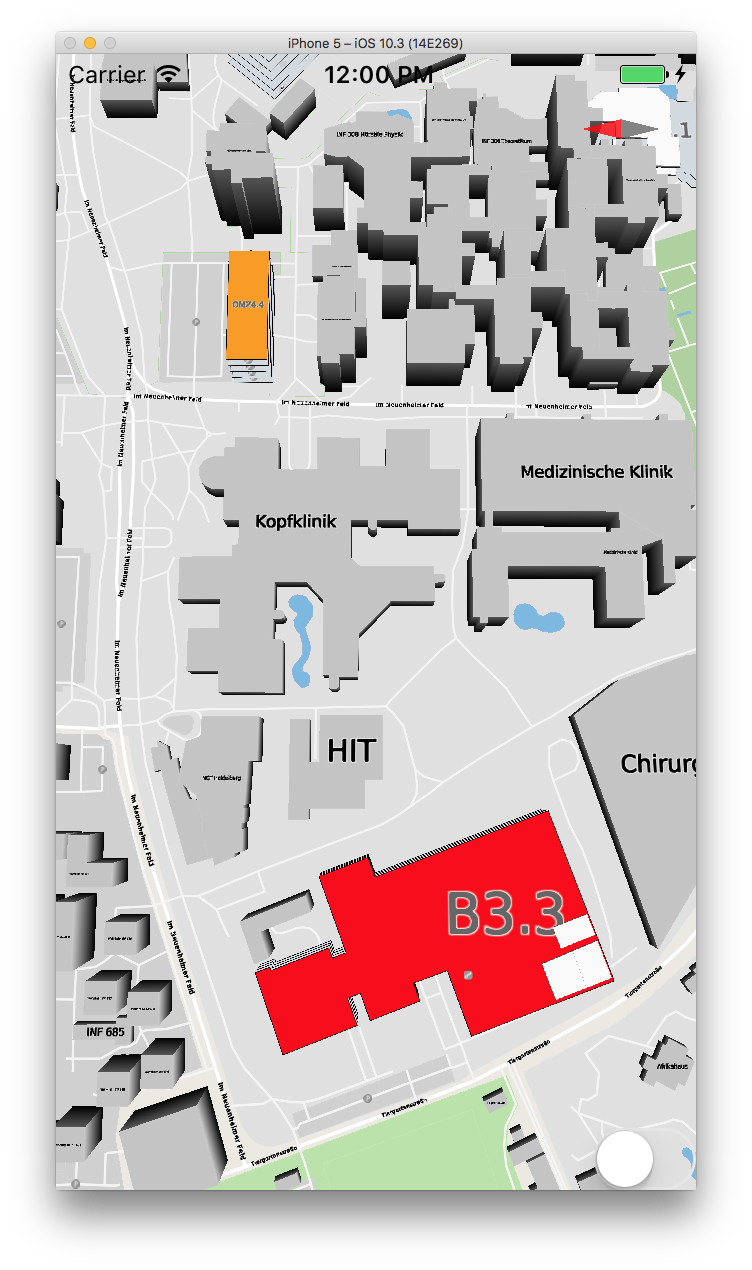
fillRate = 200 |
Styling of building “B3.3” based of different fill-rates. The toggle switch at the bottom is set up to increase fill-rate by 100 every time it is triggered.
When defining the rules, it does not matter if there is an existing attribute. If the attribute does not exist, it is set to NULL, which means every boolean statement is just evaluated to false (unless compared with “IS NULL”).
We can make the rule even more dynamic by adding two more feature attributes: fillLow and fillHigh:
Objective-C
[self.mapView setFeatureAttribute:@"fillLow" value:@"100" withFeatureId:16299];
[self.mapView setFeatureAttribute:@"fillHigh" value:@"200" withFeatureId:16299];
Swift
self.mapView.setFeatureAttribute("fillLow", value: "100", withFeatureId: 16299);
self.mapView.setFeatureAttribute("fillHigh", value: "200", withFeatureId: 16299);
Android
mapview.setFeatureAttribute("fillLow", "100", 16299);
mapview.setFeatureAttribute("fillHigh", "200", 16299);
This allows us to set individual thresholds for each building, which we can handle with the same rule. All we have to do is change our defined rules to use the new feature attributes:
DeepMap™-Rules
  rule buildingFillRate(building_type) ["fillRate < fillLow"]
  {
      fill-color: #00FF00;
  }
  rule buildingFillRate(building_type) ["fillRate >= fillLow and fillRate < fillHigh"]
  {
      fill-color: #FFa000;
  }

rule buildingFillRate(building_type) ["fillRate >= fillHigh"]
  {
      fill-color: #FF0000;
  }

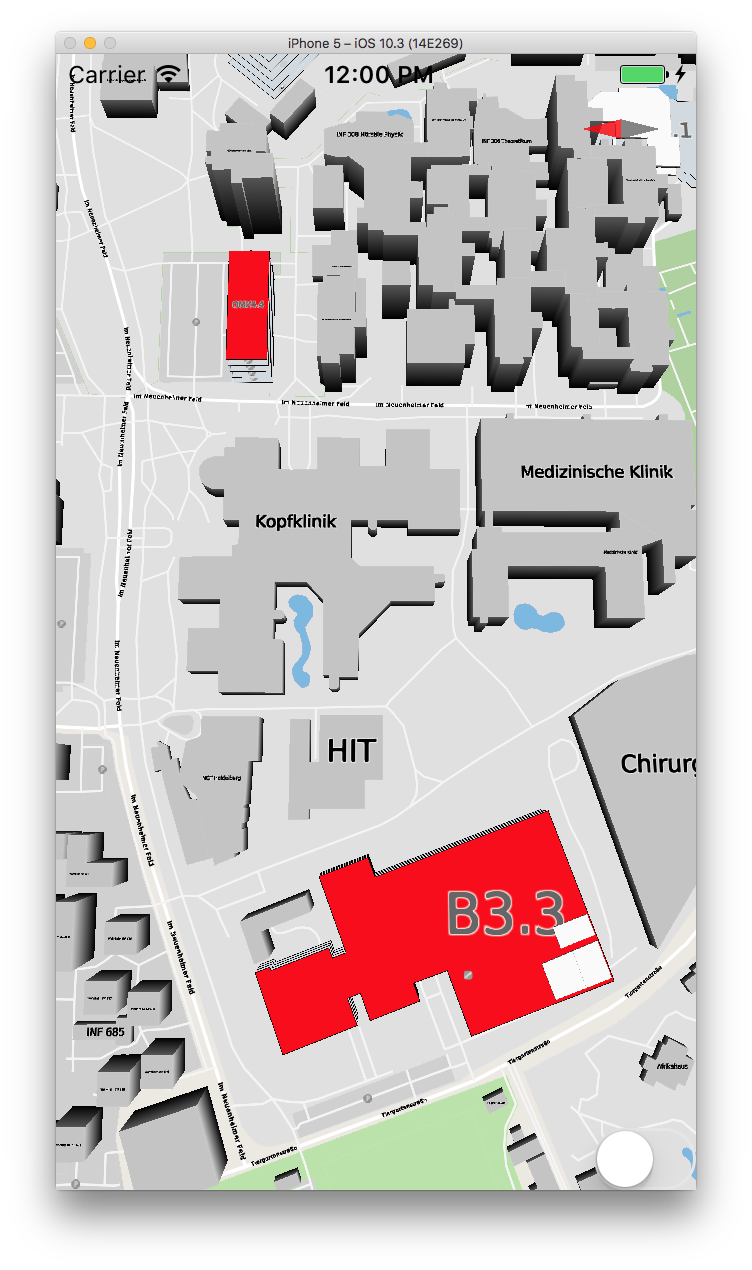
fillRate = 0
fillRate = 100
fillRate = 200
fillRate = 300
fillRate = 400
Styling of two buildings based on fill rate and different fill thresholds. The lower building has the thresholds 100 and 200, and the upper building has the thresholds 200 and 400. The toggle switch at the bottom increases the fill rate by 100 for both buildings every time it is triggered.
There is actually a third group of feature attributes: database attributes. These are set when the map-data is exported and can not be modified externally, but can be used in the rules like any other attribute. An attribute could be defined multiple times if it is set globally, per feature and in the database. This is not prohibited, but only the attribute with the highest priority is evaluated. The priorities from highest to lowest are: feature attribute > global attribute > database attribute.
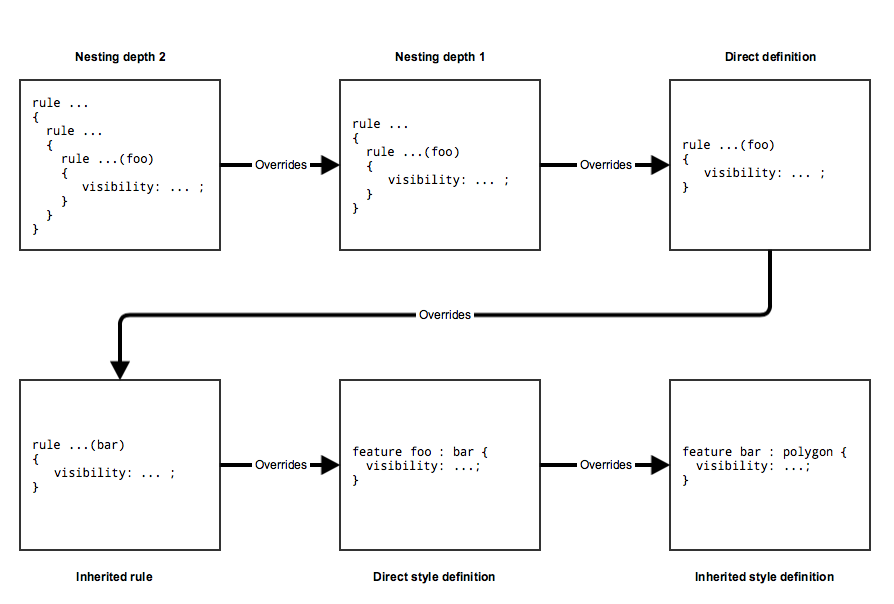
One important thing to mention is that rules also have an ordered priority when they try to modify a parameter. The order of priorities from highest to lowest: nested rules (higher depth = higher priority) > normal rules > inherited rules > default styling . Or as a rule of thumb: the more specific a rule, the higher its priority. Otherwise, it is first come first serve when two rules fall into the same category, so the order of rule-definitions is important!
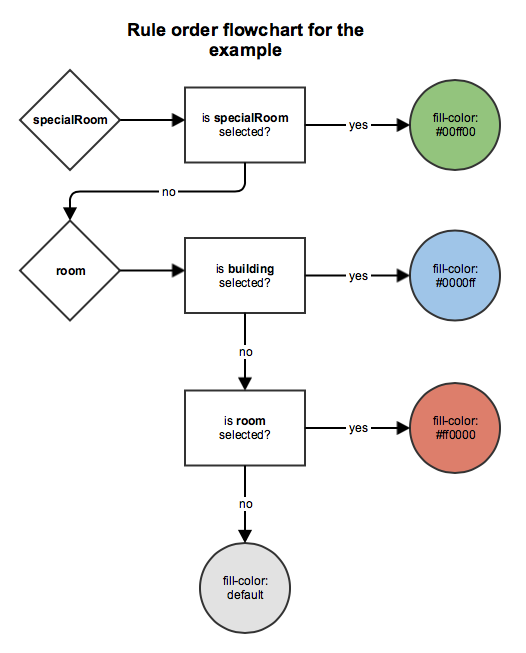
Lets have a look at another example. In the following definition, we
have three different featuretypes: room, specialRoom and
building. There are also three rules that try to modify the
fill-color of an object. Try to figure out the rule-priorites for
room and specialRoom. Look further down below to see the answer.
feature room:polygon {...}
feature specialRoom:room {...}
feature building:polygon {...}

rule roomSelected(room) ["isSelected()"]
{
        fill-color: #ff0000;
}

rule specialRoomSelected(specialRoom) ["isSelected()"]
{
        fill-color: #00ff00;
}

rule buildingSelected(building) ["isSelected()"]
{
        rule roomColor(room)
        {
                fill-color: #0000ff;
        }
}
The answer for an object of the featuretype room is simple. The rule
roomColor is nested, so it has a higher priority than the rule
roomSelected. So a selected room will be red, unless it is inside a
selected building, then the room will be blue, regardless if the room is
selected or not.
specialRoom is a bit more complicated due to the inheritance. What
might be unexpected is that specialRoomSelected has the highest
priority. This is because the rules directly defined for a featuretype
are evaluated before any inherited rule. Therefore,
specialRoomSelected has a higher priority than roomColor,
despite roomColor being a nested rule. So the complete order would
be for specialRoom: specialRoomSelected -> roomColor ->
roomSelected . Or in other words: a specialRoom always turns green
if it is selected, even if the building is selected too. It will turn
blue if it is not selected, but the underlying building is selected. It
will never turn red, because roomSelected and
specialRoomSelected are evaluated true under the same conditions and
specialRoomSelected has the higher priority.