Deep Map™ Styling
Changing Styles at Runtime
Our map can be completely styled with our own custom DeepMap™-styling language (see Deep Map™ Style Specification). Each styling parameter can be changed during runtime. Let’s add a switch, so we can change the style of our map with a flick of a button!
1. Switch with a callback function
First, we want to add a switch with a callback-function:
Objective-C
- (void)viewDidLoad {

    [super viewDidLoad];

    UISwitch *switchToggle = [[UISwitch alloc] initWithFrame: CGRectMake(0, 0, 100, 10)];

    //place switch bottom right
    switchToggle.frame = CGRectMake(self.view.frame.size.width - switchToggle.frame.size.width, self.view.frame.size.height - switchToggle.frame.size.height,         switchToggle.frame.size.width, switchToggle.frame.size.height);

    [switchToggle addTarget:self action:@selector(flip:) forControlEvents:UIControlEventValueChanged];
    [switchToggle setEnabled:YES];
    [self.view addSubview:switchToggle];
}

- (IBAction)flip:(id)sender {
    UISwitch *togSwitch = (UISwitch *) sender;
    if(togSwitch.on)
    {
    }
    else
    {
    }
}
Swift
override func viewDidLoad() {
    super.viewDidLoad()

    let switchToggle = UISwitch(frame: CGRect(origin:CGPoint(x:0.0, y:0.0),

    size:CGSize(width:100.0,height:10.0) ) );

    //place switch bottom right
    switchToggle.frame = CGRect(origin: CGPoint(x: self.view.frame.size.width - switchToggle.frame.size.width, y: self.view.frame.size.height - switchToggle.frame.size.height), size:   CGSize(width :switchToggle.frame.size.width, height:switchToggle.frame.size.height));

    switchToggle.addTarget(self, action: #selector(flip(sender:)), for: .valueChanged);
    switchToggle.setOn(true, animated: true);
    self.view.addSubview(switchToggle);
}

func flip(sender: UISwitch!){
    if(sender.isOn == true)
    {
    }
    else
    {
    }
}
Android
package com.example.rkuehl.deepmapstylingdemo;

import android.support.v7.app.AppCompatActivity;
import android.os.Bundle;
import android.widget.Switch;
import android.view.View;
import android.view.View.OnClickListener;

import com.hdm_i.dm.android.mapsdk.MapFragment;
import com.hdm_i.dm.android.mapsdk.MapView;

public class MainDeepmapActivity extends AppCompatActivity implements OnClickListener {

    private MapView _myView;

    @Override
    protected void onCreate(Bundle savedInstanceState) {
        super.onCreate(savedInstanceState);
        setContentView(R.layout.activity_main_deepmap);

        MapFragment mapFragment = (MapFragment) getFragmentManager().findFragmentById(R.id.deepmap_fragment);

        //create a Switch widget with id switch1 in the activity_main.deepmap.xml before this

        Switch toggleSwitch = this.findViewById(R.id.switch1);
        toggleSwitch.setOnClickListener(this);

        mapFragment.loadMap(new MapView.ReadyDelegate() {
            @Override
            public void onReady(MapView mapView) {
                _myView = mapView;
            }
        });
    }

    public void onClick(View v)
    {
        if(v instanceof Switch) {
            Switch toggleSwitch = (Switch) v;
            flip(toggleSwitch.isChecked());
        }
    }

    private void flip(boolean on)
    {

    }
}
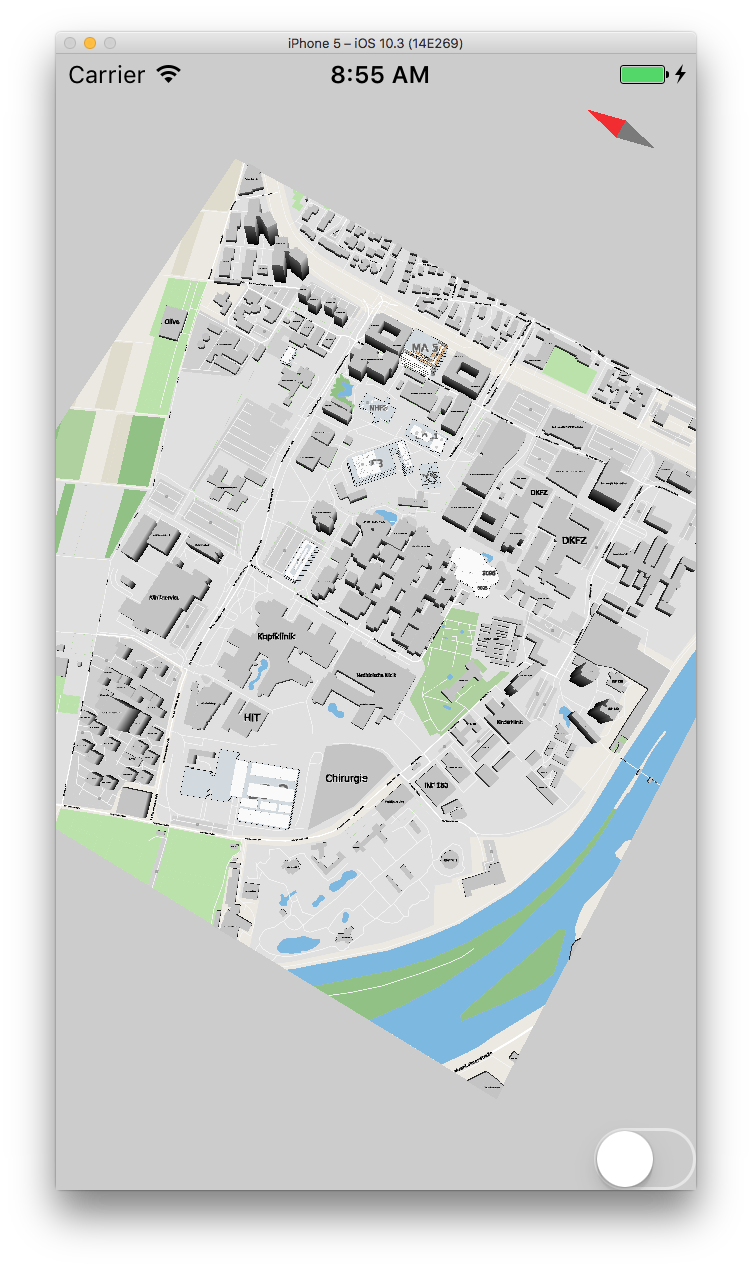
Now we have a toggle-switch on the bottom-left, and we can add actions to it in the function “flip”.
2. Colors for types of features
For example, you could set all features from the “building” type in the color blue if the switch is toggled on, and red if the switch is toggled off. This can be done with the “setFeatureStyle” function in the following way:
Objective-C
- (IBAction)flip:(id)sender {
    UISwitch *togSwitch = (UISwitch *) sender;
    if(togSwitch.on)
    {
        [self.mapView setFeatureStyle:@"building" propertyName:@"fill-color" value:@"#0000ff"];
    }
    else
    {
        [self.mapView setFeatureStyle:@"building" propertyName:@"fill-color" value:@"#ff0000"];
    }
}
Swift
func flip(sender: UISwitch!){
    if(sender.isOn == true)
    {
        self.mapView.setFeatureStyle("building", propertyName: "fill-color", value: "#0000ff");
    }
    else
    {
       self.mapView.setFeatureStyle("building", propertyName: "fill-color", value: "#ff0000");
    }
}
Android
private void flip(boolean on)
{
    if(_myView != null) {
        if (on) {
            _myView.setFeatureStyle("building", "fill-color", "#0000ff");
        } else {
            _myView.setFeatureStyle("building", "fill-color", "#ff0000");
        }
    }
}
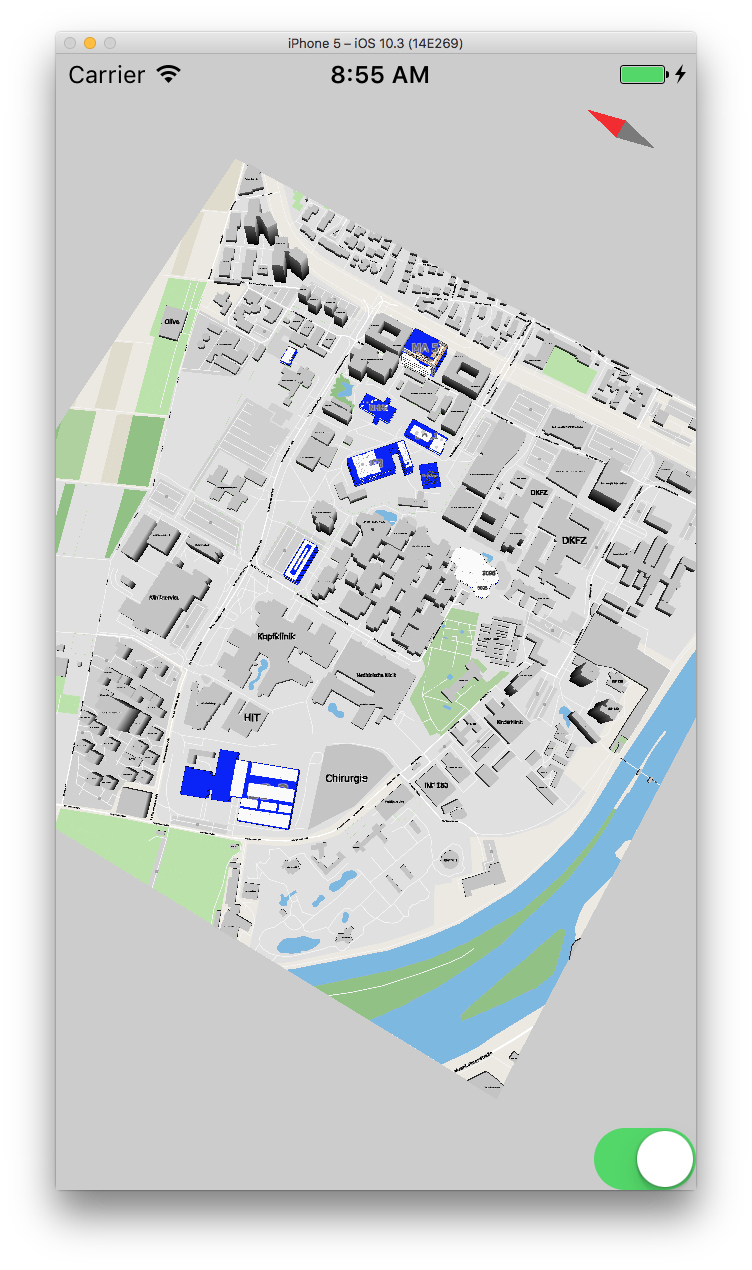
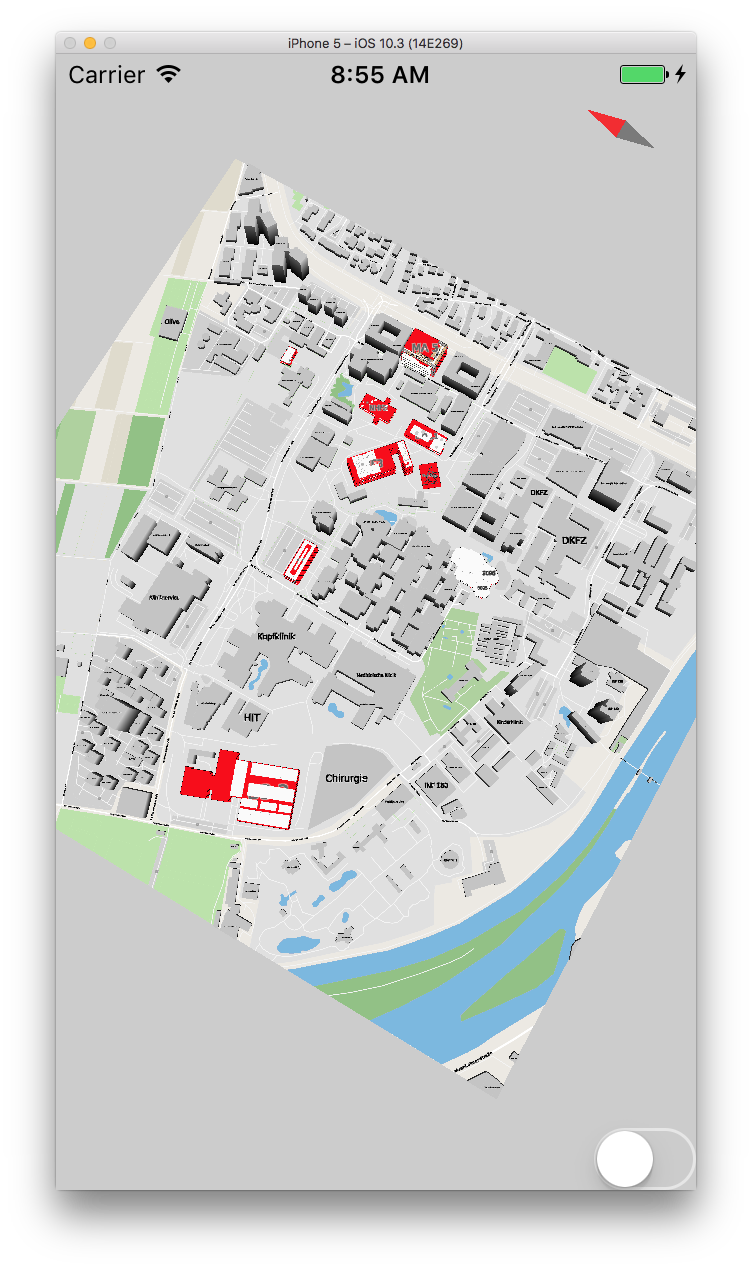
The function “setFeatureStyle” takes three parameters. The first one is the name of the featuretype we want to modify. The second one is the property to be changed. The third one is the new value. Each parameter is passed as a string, which corresponds to the DeepMap™-styling specification.
There is an optional fourth parameter, which can be used to control whether the change of a style should be updated immediately or not. Postponing an update is useful when multiple parameters should be changed at once, since it allows the engine to batch all changes into a single update, which increases rendering performance. For example, lets say that we want to hide all tables along with changing the color of the buildings. Since the tables might have labels attached to them, we have to change two additional parameters to completely hide them: “visibility” and “font-visibility”. In order to update all properties at once, we can change the code above to:
Objective-C
- (IBAction)flip:(id)sender {
    UISwitch *togSwitch = (UISwitch *) sender;
    if(togSwitch.on)
    {
        [self.mapView setFeatureStyle:@"building" propertyName:@"fill-color" value:@"#0000ff" update:NO];
        [self.mapView setFeatureStyle:@"stand_tables" propertyName:@"visibility" value:@"visible" update:NO];
        [self.mapView setFeatureStyle:@"stand_tables" propertyName:@"text-visibility" value:@"visible" update:YES];
    }
    else
    {
        [self.mapView setFeatureStyle:@"building" propertyName:@"fill-color" value:@"#ff0000" update:NO];
        [self.mapView setFeatureStyle:@"stand_tables" propertyName:@"visibility" value:@"none" update:NO];
        [self.mapView setFeatureStyle:@"stand_tables" propertyName:@"text-visibility" value:@"none" update:YES];
    }
}
Swift
func flip(sender: UISwitch!){
    if(sender.isOn == true)
    {
        self.mapView.setFeatureStyle("building", propertyName: "fill-color", value: "#0000ff", update: false);
        self.mapView.setFeatureStyle("stand_tables", propertyName: "visibility", value: "visible", update: false);
        self.mapView.setFeatureStyle("stand_ta", propertyName: "text-visibility", value: "visible", update: true);
    }
    else
    {
        self.mapView.setFeatureStyle("building", propertyName: "fill-color", value: "#ff0000", update: false);
        self.mapView.setFeatureStyle("stand_tables", propertyName: "visibility", value: "none", update: false);
        self.mapView.setFeatureStyle("stand_tables", propertyName: "text-visibility", value: "none", update: true);
    }
}
Android
private void flip(boolean on)
{
    if(_myView != null) {
        if (on) {
            _myView.setFeatureStyle("building", "fill-color", "#0000ff", false);
            _myView.setFeatureStyle("stand_tables", "visibility", "visible", false);
            _myView.setFeatureStyle("stand_tables", "text-visibility", "visible", true);
        } else {
            _myView.setFeatureStyle("building", "fill-color", "#ff0000", false);
            _myView.setFeatureStyle("stand_tables", "visibility", "none", false);
            _myView.setFeatureStyle("stand_tables", "text-visibility", "none", true);
        }
    }
}
Note that “update:YES” is optional and can be left out for convenience.
When batching multiple feature-changes, it can get difficult to keep track of which setter functions should force the style update. For example, in the code above, we could have forgotten to set “update:YES” in the “else” branch, which would make our style-switcher useless. Therefore, it is generally better to set update always to “NO”, and then call “reloadStyle” once all changes have been made:
Objective-C
- (IBAction)flip:(id)sender {
    UISwitch *togSwitch = (UISwitch *) sender;
    if(togSwitch.on)
    {
        [self.mapView setFeatureStyle:@"building" propertyName:@"fill-color" value:@"#0000ff" update:NO];
        [self.mapView setFeatureStyle:@"stand_tables" propertyName:@"visibility" value:@"visible" update:NO];
        [self.mapView setFeatureStyle:@"stand_tables" propertyName:@"text-visibility" value:@"visible" update:NO];
    }
    else
    {
        [self.mapView setFeatureStyle:@"building" propertyName:@"fill-color" value:@"#ff0000" update:NO];
        [self.mapView setFeatureStyle:@"stand_tables" propertyName:@"visibility" value:@"none" update:NO];
        [self.mapView setFeatureStyle:@"stand_tables" propertyName:@"text-visibility" value:@"none" update:NO];
    }
    [self.mapView reloadStyle];
}
Swift
func flip(sender: UISwitch!) {
    if(sender.isOn == true) {
        self.mapView.setFeatureStyle("building", propertyName: "fill-color", value: "#0000ff", update: false);
        self.mapView.setFeatureStyle("stand_tables", propertyName: "visibility", value: "visible", update: false);
        self.mapView.setFeatureStyle("stand_tables", propertyName: "text-visibility", value: "visible", update: false);
    } else {
        self.mapView.setFeatureStyle("building", propertyName: "fill-color", value: "#ff0000", update: false);
        self.mapView.setFeatureStyle("stand_tables", propertyName: "visibility", value: "none", update: false);
        self.mapView.setFeatureStyle("stand_tables", propertyName: "text-visibility", value: "none", update: false);
    }
    self.mapView.reloadStyle();
}
Android
private void flip(boolean on) {
    if(_myView != null) {
        if (on) {
            _myView.setFeatureStyle("building", "fill-color", "#0000ff", false);
            _myView.setFeatureStyle("stand_tables", "visibility", "visible", false);
            _myView.setFeatureStyle("stand_tables", "text-visibility", "visible", false);
        } else {
            _myView.setFeatureStyle("building", "fill-color", "#ff0000", false);
            _myView.setFeatureStyle("stand_tables", "visibility", "none", false);
            _myView.setFeatureStyle("stand_tables", "text-visibility", "none", false);
        }
        _myView.reloadStyle();
    }
}
Using Custom Deep Map™ Styles
All styling information is contained in two style-files, which are bundled in the DeepMap.zip file. However, it is also possible to use your own custom style-file. Create a file in your asset folder named custom.mapStyle and copy the following style-definition into it:
Custom map style
feature polygon {
    fill-color: #d0d0d0;
    visibility: visible;
    floor-selectable: false;
}

feature line {
    visibility: visible;
    line-color: #f8e9aa;
    line-translate:[0,0,0];
    line-width: 7.0m;
    line-blur: 0.0;
    line-cap: cap-butt;
    line-join: join-round;
    line-gap-width: 0.0m;
}
feature icon {
    icon-size: 8.0;
    icon-scaling: icon-scaling-fixed;
    icon-rotation: icon-rotation-rotate;
    icon-rotate: 0;
        floor-selectable: true;
}

feature routing.line:line {
        line-color: #ff0000;
        line-width: 4.0m;
}

feature osm.highway.pedestrian:line {
    line-color: #F4F4F4;
    text-size: 12;
    text-color: #000000;
    line-width: 2.0;
}

feature osm.highway.track:line {
    line-color: #F4F4F4;
    text-size: 12;
    text-color: #000000;
    line-width: 2.0;
}

feature osm.highway.tertiary:line {
    line-color: #FFFFFF;
    text-size: 12;
    text-color: #000000;
    line-width: 5.0;
}

feature osm.highway.cycleway:line {
    line-color: #F4F4F4;
    text-size: 12;
    text-color: #000000;
    line-width: 2.0;
}

feature osm.highway.footway:line {
    line-color: #F4F4F4;
    text-size: 12;
    text-color: #000000;
    line-width: 2.0;
}

feature osm.highway.residential:line {
    line-color: #FFFFFF;
    text-size: 12;
    text-color: #000000;
    line-width: 3.0;
}

feature osm.highway.service:line {
    line-color: #F4F4F4;
    text-size: 12;
    text-color: #000000;
    line-width: 2.0;
}

feature osm.amenity.school:polygon {
    fill-color: #E5E5E5;
    fill-outline-color: #E5E5E5;
    fill-outline-width: 0.5;
    text-color: #000000;
    text-size: 12;
}

feature osm.landuse.grass:polygon {
    fill-color: #B2D6A0;
    fill-outline-color: #B2D6A0;
    fill-outline-width: 0.5;
    text-color: #000000;
    text-size: 12;
}

feature osm.landuse.residential:polygon {
    fill-color: #E5E5E5;
    fill-outline-color: #E5E5E5;
    fill-outline-width: 0.5;
    text-color: #000000;
    text-size: 12;
}

feature osm.leisure.park:polygon {
    fill-color: #B2D6A0;
    fill-outline-color: #B2D6A0;
    fill-outline-width: 0.5;
    text-color: #000000;
    text-size: 12;
}

feature osm.landuse.construction:polygon {
    fill-color: #E5E5E5;
    fill-outline-color: #E5E5E5;
    fill-outline-width: 0.5;
    text-color: #000000;
    text-size: 12;
}

feature osm.amenity.college:polygon {
    fill-color: #E5E5E5;
    fill-outline-color: #E5E5E5;
    fill-outline-width: 0.5;
    text-color: #000000;
    text-size: 12;
}

feature osm.amenity.parking:polygon {
    fill-color: #D4D4D4;
    fill-outline-color: #D4D4D4;
    fill-outline-width: 0.5;
    text-color: #000000;
    text-size: 12;
}

feature osm.leisure.pitch:polygon {
    fill-color: #BFE8AC;
    fill-outline-color: #BFE8AC;
    fill-outline-width: 0.5;
    text-color: #000000;
    text-size: 12;
}

feature osm.leisure.sports_centre:polygon {
    fill-color: #BFE8AC;
    fill-outline-color: #BFE8AC;
    fill-outline-width: 0.5;
    text-color: #000000;
    text-size: 12;
}

feature osm.amenity.university:polygon {
    fill-color: #E5E5E5;
    fill-outline-color: #E5E5E5;
    fill-outline-width: 0.5;
    text-color: #000000;
    text-size: 12;
}

feature osm.tourism.zoo:polygon {
    fill-color: #E5E5E5;
    fill-outline-color: #E5E5E5;
    fill-outline-width: 0.5;
    text-color: #000000;
    text-size: 12;
}

feature osm.landuse.industrial:polygon {
    fill-color: #E5E5E5;
    fill-outline-color: #E5E5E5;
    fill-outline-width: 0.5;
    text-color: #000000;
    text-size: 12;
}

feature background:polygon {
    fill-color: #F1EEE8;
    fill-outline-color: #F1EEE8;
    fill-outline-width: 0.5;
    text-color: #000000;
    text-size: 12;
}

feature osm.landuse.farmland:polygon {
    fill-color: #E3DFD0;
    fill-outline-color: #E3DFD0;
    fill-outline-width: 0.5;
    text-color: #000000;
    text-size: 12;
}

feature osm.natural.water:polygon {
    fill-color: #7CBBE6;
    fill-outline-color: #9EB4D6;
    fill-outline-width: 0.5;
    text-color: #000000;
    text-size: 12;
}

feature osm.leisure.playground:polygon {
    fill-color: #BFE8AC;
    fill-outline-color: #BFE8AC;
    fill-outline-width: 0.5;
    text-color: #000000;
    text-size: 12;
}

feature osm.natural.wood:polygon {
    fill-color: #94C687;
    fill-outline-color: #94C687;
    fill-outline-width: 0.5;
    text-color: #000000;
    text-size: 12;
}

feature osm.leisure.garden:polygon {
    fill-color: #B2D6A0;
    fill-outline-color: #B2D6A0;
    fill-outline-width: 0.5;
    text-color: #000000;
    text-size: 12;
}

feature osm.waterway:polygon {
    fill-color: #7CBBE6;
    fill-outline-color: #9EB4D6;
    fill-outline-width: 0.5;
    text-color: #000000;
    text-size: 12;
}

feature osm.landuse.meadow:polygon {
    fill-color: #B2D6A0;
    fill-outline-color: #B2D6A0;
    fill-outline-width: 0.5;
    text-color: #000000;
    text-size: 12;
}

feature icon_atm:icon {
    icon-rotate: 0;
    icon-size: 6.0;
}

feature icon_firstaid:icon {
    icon-rotate: 0;
    icon-size: 6.0;
}

feature icon_phone:icon {
    icon-rotate: 0;
    icon-size: 6.0;
}

feature icon_parking:icon {
    icon-rotate: 0;
    icon-size: 6.0;
}

feature stair:icon {
    icon-rotate: 0;
    icon-size: 6.0;
}

feature icon_toilet:icon {
    icon-rotate: 0;
    icon-size: 6.0;
}

feature icon_wifi:icon {
    icon-rotate: 0;
    icon-size: 6.0;
}

feature icon_meeting:icon {
    icon-rotate: 0;
    icon-size: 6.0;
}

feature entry:icon {
    icon-rotate: 0;
    icon-size: 6.0;
}

feature icon_cafe:icon {
    icon-rotate: 0;
    icon-size: 6.0;
}

feature elevator:icon {
    icon-rotate: 0;
    icon-size: 6.0;
}

feature fg_polygons:polygon {
    fill-color: #FFFFFF;
    fill-outline-color: #AAAAAA;
    fill-outline-width: 0.1;
    text-color: #000000;
    text-size: 12;
        floor-selectable: true;
}

feature fg_walls:polygon {
    fill-color: #666666;
    fill-outline-color: #595959;
    fill-outline-width: 0.0;
    text-color: #000000;
    text-size: 12;
        floor-selectable: true;
}

feature building:polygon {
    fill-color: #D7DEE3;
    fill-outline-color: #000000;
    fill-outline-width: 0.5;
    text-color: #666666;
    text-size: 14;
        floor-selectable: true;
}

feature osm.building:polygon {
    fill-color: #C8C8C8;
    fill-outline-color: #C8C8C8;
    fill-outline-width: 0.5;
    text-color: #000000;
    text-size: 12;
}

feature stand_rooms:polygon {
    fill-color: #DEB887;
    fill-outline-color: #C7A579FF;
    fill-outline-width: 0.0;
    text-color: #000000;
    text-size: 12;
        floor-selectable: true;
}

feature stand_manual:polygon {
    fill-color: #FFFFFF;
    fill-outline-color: #AAAAAA;
    fill-outline-width: 0.1;
    text-color: #333333;
    text-size: 12;
        floor-selectable: true;
}

feature stand_tables:polygon {
    fill-color: #FFFFFF;
    fill-outline-color: #AAAAAA;
    fill-outline-width: 0.05;
    text-color: #000000;
    text-size: 12;
        floor-selectable: true;
}


rule selectionrule(building) [" isSelected() "] {
        fill-color: #ff5511;
}

rule selectionrule(osm.building) [" isSelected() "] {
        fill-color: #ff5511;
}

rule selectionrule(stand_rooms) [" isSelected() "] {
        fill-color: #ff5511;
}

rule selectionrule(stand_manual) [" isSelected() "] {
        fill-color: #ff5511;
}

rule selectionrule(stand_tables) [" isSelected() "] {
        fill-color: #ff5511;
}
The .mapStyle file contains static styling and rules for dynamic styling. For now, we will only focus on the styling. We can use the style-file in the map in the following way:
Objective-C
- (void)viewDidLoad {
    /*
        ...
    */
    [self.mapView switchStyles:[[NSBundle mainBundle] pathForResource:@"custom" ofType:@"mapStyle"]];
}
Swift
override func viewDidLoad() {
    /*
    ...
    */

    self.mapView.switchStyles(Bundle.main.path(forResource: "custom", ofType: "mapStyle"));
}
Android
mapFragment.loadMap(new MapView.ReadyDelegate() {
    @Override
    public void onReady(MapView mapView) {
        //...
        //Read file from APK and store it in cached dir

        File f = new File(getCacheDir() + "/custom.mapStyle");
        try {

            InputStream is = getAssets().open("custom.mapStyle");
            byte[] buffer = new byte[is.available()];
            is.read(buffer);
            is.close();


            FileOutputStream fos = new FileOutputStream(f, false);
            fos.write(buffer);
            fos.close();

        } catch (Exception e) { throw new RuntimeException(e);}

        //Pass file-path to mapView
        mapView.setStyle(f.getPath());
    }
}
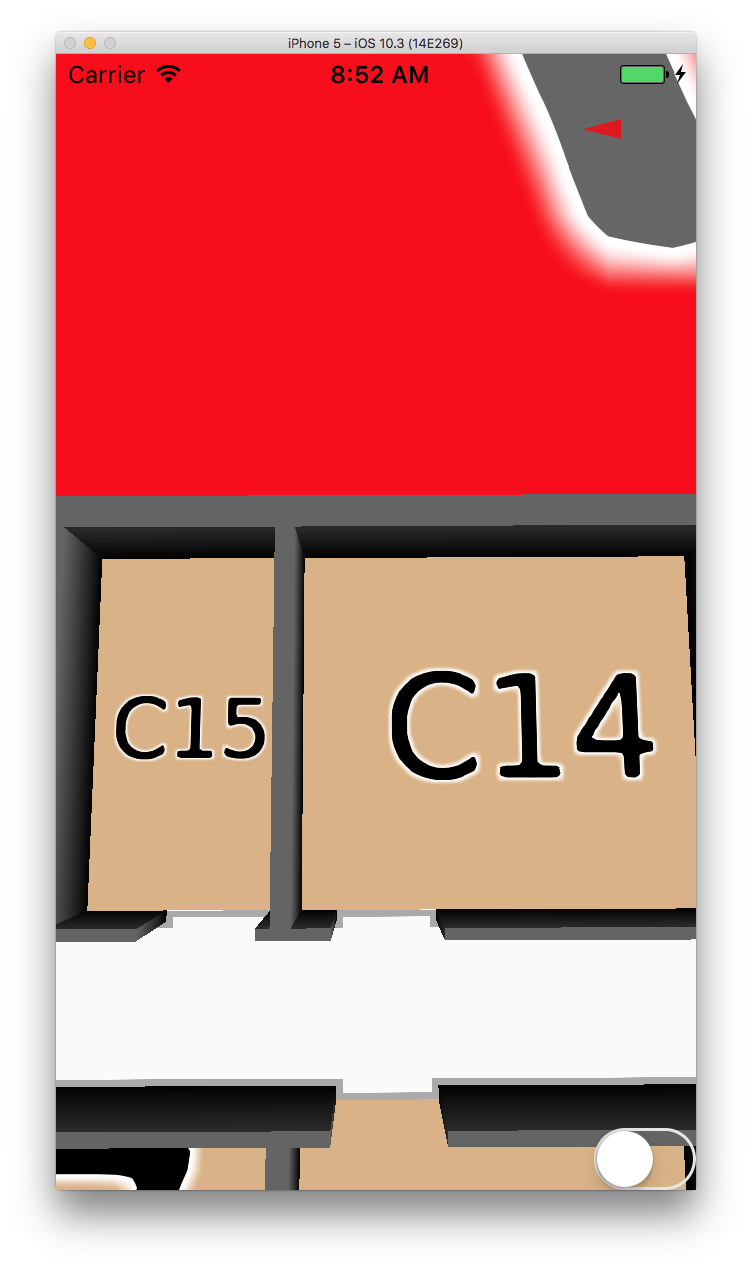
If you run the app now, you will not notice any difference. This is because the style-file mentioned above is the same as the one bundled in DeepMap.zip. To see the effect, edit the custom.mapStyle file, and change the “fill-color” of the feature “building” from “#D7DEE3” to “#FF0000”:
Custom map style
feature building:polygon {
    fill-color: #FF0000;
    fill-outline-color: #000000;
    fill-outline-width: 0.5;
    text-color: #666666;
    text-size: 14;
    floor-selectable: true;
}
If you start the app again, you should now notice that all polygons of the featuretype “building” are now red. It is possible to change every property this way. Please consult the following page for a complete overview of our styling language (see “Deep Map™ Style Specification” in the Documentation section).